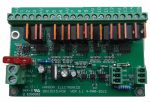


Description
Raspberry Pi Multifunction Adapter PCB to support 1 2811 output, 1 DMX output and 1 Panel (Px) output with Oled display and Real time clock
-
-
- Supports 1 2811 pixel output
- Supports 1 Panel output P5, P10 etc
- Supports 1 non-isolated DMX output
- Real Time Clock (RTC) for show scheduling
- Oled display to show FPP status and for accessing settings
- Up, Down and Enter jumpers for accessing and editing FPP statuses and settings
- 3 GPIO user inputs
- Runs under Falcon Player (FPP)
- Has 75HC245 to level shift signals from Raspberry Pi 3.3V logic to 5V logic
- Can power cape and Raspberry Pi from 5V or 12V input
- Mounting holes to suit Pi 2, Pi 3 and Pi Zero
- Supplied with M2.5 Nylon spacers to separate the Pi and rPi-MFC
- 1 fused power inputs for the pixel outputs. 5V , 12V or 24V pixels can be connected
- Supplied with 7.5A ATO automotive fuse
-
Note: Raspberry Pi, SD or micro SD card and USB thumbdrive are not supplied. Included in photos to show the application.
A Class 10 SD/Micro SD card is recommended and 8-32GB is the recommended size range.
The rPi-MFC requires a Raspberry Pi (2, 3 or Zero) running Falcon Player and configured with channels, sequences and channel output settings.
The installation procedure for Falcon Player (FPP) is below.
http://falconchristmas.com/forum/index.php/topic,483.0.html
The installation process for FPP 2.x and FPP 3.x is different but is linked from the above link.
Updated manual will be uploaded soon.
Until the manual finally gets updated there are some screenshots of the setup in FPP 4.3
https://www.hansonelectronics.com.au/wp-content/uploads/2020/11/MFC-screenshots.zip
In some cases the EEPROM that is in the rpi-MFC is missing the information that allows FPP to detect that it’s a rPi-MFC connected. If FPP isn’t showing a Hanson Electronics logo at the top right of the FPP screen then it’s probably missing the file. The script and instructions to run it are at https://www.hansonelectronics.com.au/wp-content/uploads/2020/07/rpi-mfc-files-and-instructions.zip